前两天鼓捣新网站的时候挖掘的利器,很酷的JS框架。 之所以我对他这么欢喜,主要是这货是支持Gephi的...然后还实现了interactive graph...真的是夫复何求呀!Gephi有个插件Sigmajs Exporter,安一下即可。
这里主要记录一下用这个框架初期遇到的一些困难...感觉本身的tutorial写的不是特别好...浪费了我一些时间google什么的。
Hello World
Sigma.js首页有个特别简单的hello world例子,但实际测试并没有那么容易搞定。
Here is the minimal code to create an instance:
var sigRoot = document.getElementById('sig');
var sigInst = sigma.init(sigRoot);
sigInst.addNode('hello',{
  label: 'Hello',
  color: '#ff0000'
}).addNode('world',{
  label: 'World !',
  color: '#00ff00'
}).addEdge('hello_world','hello','world').draw();
主要的问题是完全不知道这东西应该怎么搞到一个静态的HTML网页中。Google了一下,终于找到一个本地可以成功run的例子。
<html>
<head>
  <script src="http://ajax.googleapis.com/ajax/libs/jquery/1.8.3/jquery.min.js"></script>
  <script type="text/javascript" src="http://sigmajs.org/js/sigma.min.js"></script>
  <script type="text/javascript">
    $(document).ready(function() {
      var sigRoot = document.getElementById('sig');
      var sigInst = sigma.init(sigRoot).drawingProperties({
        defaultLabelColor: '#ccc',
        font: 'Arial',
        edgeColor: 'source',
        defaultEdgeType: 'curve'
      }).graphProperties({
        minNodeSize: 1,
        maxNodeSize: 10
      });

      sigInst.addNode('hello',{
        label: 'Hello',
        color: '#ff0000',
        x: 1
      }).addNode('world',{
        label: 'World !',
        color: '#00ff00',
        x: 2
      }).addEdge('hello_world','hello','world').draw();
    });
  </script>

  <style type="text/css">
    /* sigma.js context : */
    .sigma {
      margin-left:auto;
      margin-right:auto;
      position: relative;
      border-radius: 4px;
      -moz-border-radius: 4px;
      -webkit-border-radius: 4px;
      background: #222;
      width: 80%;
      height: 80%;
      top: 0;
      left: 0;
    }
  </style>

</head>
<body>

  <div class="sigma" id="sig"></div>

</body>
</html>
嗯,copy/paste之后终于看到Hello World了。大概看了一下,这段代码的核心就是那段JS,然后在body段建一个新的空div,id命名好就可以了。于是乎开始琢磨着把Sigma.js首页的banner扒过来。
清理了一番首页的代码,发现保留这一段就可以顺利实现banner的效果了。
<!doctype html>
<html class="no-js" lang="en">
<head>
  <meta charset="utf-8">
  <meta http-equiv="X-UA-Compatible" content="IE=edge,chrome=1">

  <title>sigma.js | a lightweight JavaScript graph drawing library</title>
  <meta name="description" content="">
  <meta name="author" content="Alexis Jacomy">
  <meta name="robots" content="all" />

  <meta name="viewport" content="width=device-width">

  <script src="js/prettify.js"></script>
  <script src="js/sigma.min.js"></script>

</head>
<body onload="prettyPrint();">

    <div class="container">
      <div class="hero-unit">
           <div class="sigma-parent sigma-expand">
               <div class="sigma-expand" id="sigma-1"></div>
            </div>
              <div class="intro">
                   <h1 class="sigma-font">sigma.js</h1>
                   <p>Web network visualization made easy</p>
              </div>
   			 <div class="sigma-expand" id="mouselayer-sigma-1"></div>
	</div>

<style type="text/css">
  .social-container {
    overflow: hidden;
    margin: 0 auto;
  }

  /* Custom page style : */
  .hero-unit {
    position: relative;
    color: #fff;
  }

  .hero-unit h1 {
    letter-spacing: 0;
    color: #fff;
  }

  .hero-unit h1,
  .hero-unit p {
    text-shadow: 1px 1px 4px #000;
  }

  .hero-unit div.intro {
    position: relative;
  }

  .centered {
    text-align: center;
  }

  #introduction,
  #introduction * {
    font-size: 16px;
  }

  /* sigma.js context : */
  .sigma-parent {
    position: relative;
    border-radius: 4px;
    -moz-border-radius: 4px;
    -webkit-border-radius: 4px;
    background: #222;
  }

  .sigma-expand {
    position: absolute;
    width: 100%;
    height: 100%;
    top: 0;
    left: 0;
	height:500px
  }

</style>

<script src="js/sigma.fisheye.js"></script>
<script type="text/javascript">
  function init() {
    function getRandomColor(a, b) {
      var r = Math.random();
      return 'rgb('+
             ((a.r+(b.r-a.r)*r)|0).toString() +
             ','+
             ((a.g+(b.g-a.g)*r)|0).toString() +
             ','+
             ((a.b+(b.b-a.b)*r)|0).toString() +
             ')';
    };

    var colorFrom = {
      r: 32,
      g: 79,
      b: 25
    };

    var colorTo = {
      r: 180,
      g: 255,
      b: 158
    };

    /**
     * sigma.js instance 1 (banner) :
     */
    s1 = sigma.init(document.getElementById('sigma-1')).configProperties({
      drawHoverNodes: false
    }).drawingProperties({
      labelThreshold: 10000,
      defaultEdgeType: 'curve'
    }).mouseProperties({
      mouseEnabled: false
    }).graphProperties({
      scalingMode: 'outside'
    });

    var i, N = 300, E = 600;

    for(i=0;i<N;i++){
      s1.addNode(i,{
        'x': Math.random(),
        'y': Math.random(),
        'size': 0.5+5*Math.random(),
        'color': getRandomColor(colorFrom,colorTo)
      });
    }

    for(i=0;i<E;i++){
      s1.addEdge(i,Math.random()*N|0,Math.random()*N|0);
    }

    s1.draw();

    var newParent = document.getElementById('mouselayer-sigma-1');
    var mouseLayer = document.getElementById('sigma_mouse_1');

    newParent.appendChild(mouseLayer);

    mouseLayer.addEventListener('mouseover', function() {
      s1.activateFishEye();
    }, true);
    mouseLayer.addEventListener('mouseout', function() {
      s1.desactivateFishEye().draw(2,2,2);
    }, true);

    /**
     * Resize every instances on window resizing, and
     * some divs :
     */
    function resize(event){
      for(var key in sigma.instances) {
        sigma.instances[key].resize();
      }
    };

    window.onresize = resize;
    resize();
  }

  /**
   * Wait for the DOM to be ready to start :
   */
  if (document.addEventListener) {
    document.addEventListener("DOMContentLoaded", init, false);
  } else {
    window.onload = init;
  }
</script>

  </div>
</body>
</html>
看了一下几个核心的参数:
var colorFrom = {
      r: 32,
      g: 79,
      b: 25
    };

    var colorTo = {
      r: 180,
      g: 255,
      b: 158
    };
这里是调node颜色的。
var i, N = 300, E = 600;
N是node的数目,E是edge的数目。所以这个banner实际上是每次随机生成一个300个点600条边的random graph。
其中除了sigma.min.js之外,还需要保存一下prettify.js以及sigma.fisheye.js,其中后者实现了鼠标滑过的“鱼眼”效果。
至此,这段代码拷到我自己的首页里面就是最上面的banner了。当然我在CSS里面加了一下opacity属性实现半透明的效果(要不就喧宾夺主的感觉呃)。
Sigmajs Exporter:直接从Gephi导出interactive graph
依旧不死心,又研究了一下Sigmajs Exporter。这货不是一般的方便啊。
安装插件比较简单
- Run Gephi.
- Go to the menu Tools > Plugins > Available Plugins.
- Click on Reload Catalog if the plugin you’re looking for is missing.
- Select the plugin(s).
- Click on Install, and follow the wizard.
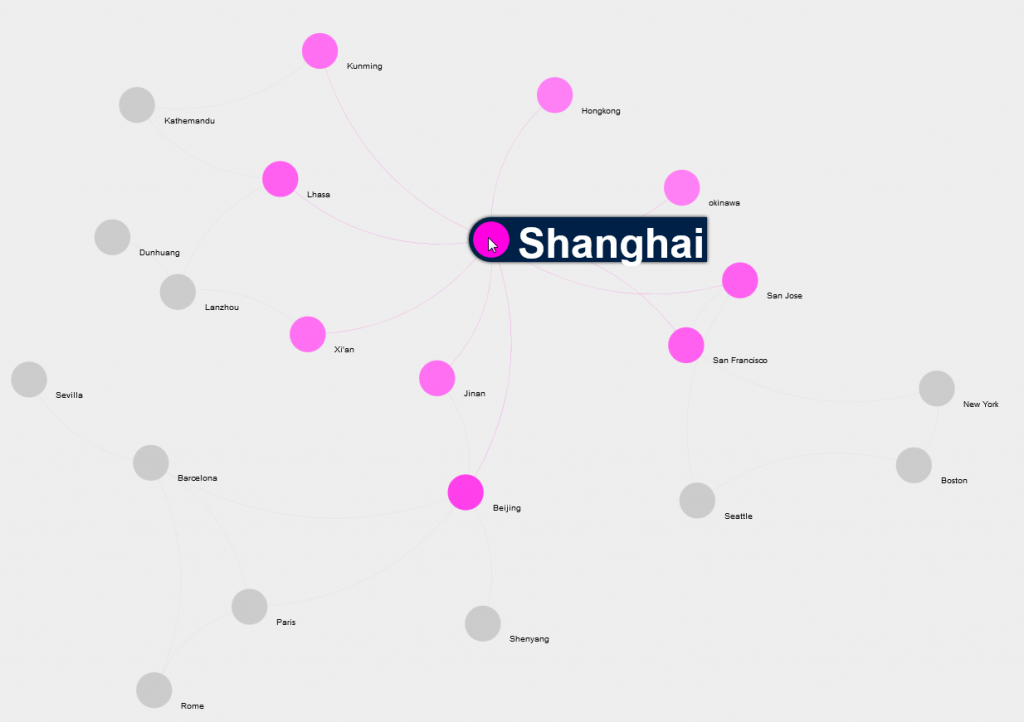
然后重启Gephi,就会看到Export to sigma.js option on the File->Export menu。简单的写一些信息就直接导出了。这里缺少一点提示,默认会在自己选择的路径下新建network文件夹,里面存放各种导出的文件。直接双击index.html就好啦。比如我这里自己导出来的:http://cloudlychen.net/networkplaces/
 嗯到这里我就满足啦。更多的参数可以直接在config.json里面改:
{
  "type": "network",
  "version": "1.0",
  "data": "data.json",
  "logo": {
    "text": "liyun",
    "file": "",
    "link": ""
  },
  "text": {
    "title": "place",
    "more": "place",
    "intro": "place"
  },
  "legend": {
    "edgeLabel": "path",
    "colorLabel": "color",
    "nodeLabel": "city"
  },
  "features": {
    "search": true,
    "groupSelectorAttribute": false,
    "hoverBehavior": "dim"
  },
  "informationPanel": {
    "imageAttribute": "Label",
    "groupByEdgeDirection": false
  },
  "sigma": {
    "graphProperties": {
      "minEdgeSize": 0.2,
      "maxNodeSize": 7,
      "maxEdgeSize": 0.5,
      "minNodeSize": 1
    },
    "drawingProperties": {
      "labelThreshold": 1,
      "hoverFontStyle": "bold",
      "defaultEdgeType": "curve",
      "defaultLabelColor": "#000",
      "defaultLabelHoverColor": "#fff",
      "defaultLabelSize": 14,
      "activeFontStyle": "bold",
      "fontStyle": "bold",
      "defaultHoverLabelBGColor": "#002147",
      "defaultLabelBGColor": "#ddd"
    },
    "mouseProperties": {
      "minRatio": 0.75,
      "maxRatio": 20
    }
  }
}
比如labelThreshold这个可以决定,当大于多少的时候显示label。
---------------------------------------
所以说,有了这个框架,可以玩的东西又多了很多呢。插件开发者blog这里http://blogs.oii.ox.ac.uk/vis/?page_id=115有更多的例子可以看看嗯,包括地图什么的。